|
Tips for printing on corrugated
plastic
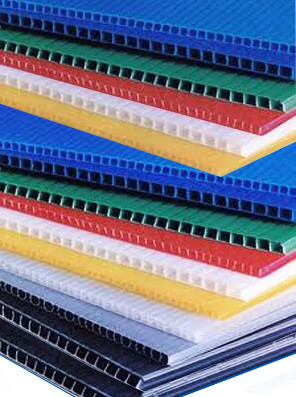
 Corrugated plastic
is a light weight, tough material which can be easily cut and formed.
It is offered in a wide range of colors and thicknesses. It is known
under many trade names including Coroplast, IntePro, Correx, Corflute
and others. Corrugated plastic
is a light weight, tough material which can be easily cut and formed.
It is offered in a wide range of colors and thicknesses. It is known
under many trade names including Coroplast, IntePro, Correx, Corflute
and others.
Chemically inert, most solvents, oils or water have no effect. It can
handle the rigors of adverse weather and can be produced flame
retardant. These factors coupled with low-cost make it an ideal
material to create commercial signs. These signs run the gamut from
yard to political whose main attribute is inexpensive yet durable
product.
Unfortunately the nature of UV ink in tandem with the substrate’s
non-porous properties can make one’s stomach do flips or one’s hair
stand on end. Before you reach for the Tums and Brylcreem here are a
few hints to ease your pain.
Let me set the stage, TCS
Technologies is a UV lamp manufacturer. We specialize in providing
second source replacement ultraviolet lamps for a wide variety of UV
printers. We are not affiliated with any printer or ink
manufacturer. Any recommendations we have relate to UV lamp--ink
performance. Many companies are quick to place blame on the UV lamp. In
most cases nothing could be further than the truth. For example, take
the same ink operating at the same speed on a different substrate; if
it cures, the issue lies outside the UV lamp.
If you listen to most printing machine salesman they will go to great
lengths to explain that their machine will print anything, do anything
and cost nothing to operate. If you ask about printing on Coroplast or
Correx, etc., they will tell you “piece of cake”. Well my experience is
nothing could be further from the truth.
The main problem printing on
corrugated plastic is ADHESION. There is nothing more
frustrating than printing a job that looks great out of the printer
only to have the ink tear, flake off or pull away from the finished
product.
Things you can try:
- Talk to your raw material supplier. Try
to get by the salesman and find some tech-service guy who actually
knows the product. These people exist and you need be persistent to
find them. If you cannot find “the geek” in technical service consider
alternative product or supplier. You will be surprised how quickly “the
geek” will be made available.
 Eliminate static.
Corrugated plastic is notorious for static issues.
Dust sticks to it,
hence when you print, your ink “adheres” to the charged particles
rather than the material surface itself. If sufficient charge is
present one could re-direct ink droplets and you end up with an
off-target ink ghosting. When attempting to reduce static you must
eliminate charge on BOTH SIDES of the substrate. There are
anti-static
wands and other methods available but the easiest is to pre-wash
(wipe-down) the substrate using isopropyl alcohol or an alcohol and
water solution. Again if you do not treat both sides your
problem
will never go away. Eliminate static.
Corrugated plastic is notorious for static issues.
Dust sticks to it,
hence when you print, your ink “adheres” to the charged particles
rather than the material surface itself. If sufficient charge is
present one could re-direct ink droplets and you end up with an
off-target ink ghosting. When attempting to reduce static you must
eliminate charge on BOTH SIDES of the substrate. There are
anti-static
wands and other methods available but the easiest is to pre-wash
(wipe-down) the substrate using isopropyl alcohol or an alcohol and
water solution. Again if you do not treat both sides your
problem
will never go away.
- Put less ink down. Seems obvious but often
overlooked. Corrugated plastic is non-absorbent, apply smallest
amount of ink to do the trick. If you see “orange peel”,
bi-directional banding (lawn mower effect) you certainly will have
adhesion issues with corrugated plastic. For a solution you need to
check your printer manual to adjust lay down.
- Allow adequate post cure. Salesman
will tell you UV curing is instantaneous process with immediate
results. Truth is the ink feels dry but is actually pinned in place.
There is a post cure phenomenon that can take up to 36 hours to
complete. Proper adhesion requires a through and complete cure. Ink
that appears to be dry continues to cure for some time after printing,
which allows for improved adhesion. This is particularly true in the
first 24 hours after printing, but can continue for up to 36 hours. For
best results, delay trimming of adhesion-challenged materials during
this post-print-cure period. Hold off on any rigorous testing or
handling until the sheet is fully cured.
- Consider adhesion promoters. As
stated above, cleaning substrate with alcohol or an alcohol and water
solution may improve adhesion. To achieve a strong bond on non-porous
substrate consider an adhesion promoter. Consult you ink supplier for
recommendations.
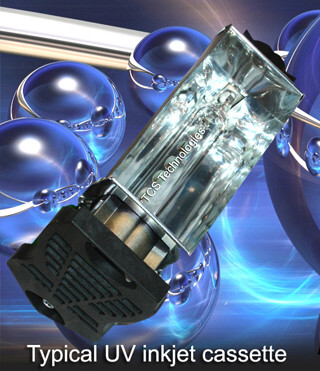
- Adjust UV lamp output. Most inkjet
printers estimate UV lamp life around 500 hours (idol time plus print
time). To reach this goal they suggest operating the lamps at low power
for the first 300 hours and gradually increasing power as the lamp
ages. Simply defined, it is the hours the lamp produces enough UV
energy to properly cure the ink within the available exposure time. In
the case of corrugated plastic, lamp life is significantly reduced.
Most jobs cannot be run other than at high power. At TCS Technologies
we have developed a lamp specifically for use on corrugated plastic. UV
penetration is increased with about 25% reduction in life. The good
news is our lamps cost 50% to 60% less than the OEM lamp so this is not
as painful as it sounds. If your adhesion problems are UV intensity
related, then increasing lamp power will increase the ink’s bond with
the substrate. This is especially true when printing more than one
coat. In this case the first printed layer must be fully cured before
subsequent coats are applied. Adjust combination of lamp power and
print speed. In a perfect world, ink and media bond is improved at high
lamp power and slow print speed. Consider uni-directional printing over
bi-directional. Since this is not a perfect world, this combination
produces the highest amount of heat perhaps adversely affecting
(warping) the substrate. Some printers offer an option of UV exposure
without printing. This allows for lower temperature multiple exposures.
To further complicate matters, there is a fine line between adequate
and over-curing. This can cause ink to become too brittle and flaky
when trimmed.
 Clean reflectors, quartz plates and air
filters. Most ultraviolet lamps are air cooled hence they must
live with whatever air is provided. Lamps must be kept clean. All types
of dust, powder, grease, smoke and misting ink must be cleaned from
lamp. Often shop contaminants will blow over the lamp sticking to the
quartz literally baking onto the surface. This reduces UV energy and
may cause bulb overheating. The same holds true with reflectors, and
quartz plates (if used). Use a lint free cloth with Windex or Simple
Green to clean. Don't waste your money on special UV lamp cleaners as
they have dubious value! If solvents are permitted, use isopropyl
alcohol. For extreme cases use a mild abrasive such as Soft Scrub to
clean the UV lamp. Be sure to rinse any residue off the glass before
reinstalling lamp. Consider replacing quartz filter plate (also
available from TCS Technologies) to maximize UV performance. Clean reflectors, quartz plates and air
filters. Most ultraviolet lamps are air cooled hence they must
live with whatever air is provided. Lamps must be kept clean. All types
of dust, powder, grease, smoke and misting ink must be cleaned from
lamp. Often shop contaminants will blow over the lamp sticking to the
quartz literally baking onto the surface. This reduces UV energy and
may cause bulb overheating. The same holds true with reflectors, and
quartz plates (if used). Use a lint free cloth with Windex or Simple
Green to clean. Don't waste your money on special UV lamp cleaners as
they have dubious value! If solvents are permitted, use isopropyl
alcohol. For extreme cases use a mild abrasive such as Soft Scrub to
clean the UV lamp. Be sure to rinse any residue off the glass before
reinstalling lamp. Consider replacing quartz filter plate (also
available from TCS Technologies) to maximize UV performance.
- Make sure shutters are operating correctly.
Make absolutely sure the lamp assembly shutters are opening completely.
On more than one occasion we have seen screws come loose preventing the
shutter from opening. It is hard enough working with corrugated
plastic. The key to success is having a high output lamp mounted in a
clean fully operating UV system.
- Talk to your printer’s tech-service manager.
Some printers are simply not designed to effectively print corrugated
plastic. You will not hear this from the sales department but you might
from engineering or tech-service.
- Consider changing ink suppliers. Your
printer is must operate over a wide range of substrates hence the OEM
ink must do the same. The result may be questionable adhesion on
plastics. If all else fails consider alternative ink supplier. We have
seen significant improvement in adhesion based solely on ink and or ink
color.
Remember there is a fine line between adhesion and cure. However
adhesion or better put lack of is not simply indicative of faulty UV
lamp. Many factors influence adhesion. If your ink adheres to a
different substrate it is safe to assume you are dealing with an
adhesion problem not a lamp problem. At TCS Technologies we are happy
to work with you. If all else fails consider top coating. Feel
free to contact us with any questions.
|


